The material design concept was created by Google so developers (mostly Android application developers) can have a unified and clear UX guideline and template set to work with. They have opened-up the specifications so developers can use and extend it. To understand it a little bit better, here's a short video about the material design concept.
There are 4 implementations of the material design standard in the Web development world: Polymer, Materialize, MaterialUI and Angular Material. When AngularJS was released in 2009 it was expected to be popular and widely adopted. Nowadays, it’s been the most widely-used UI Framework used on the Web, so in this article I'll be using the Angular Material kit. The source code shown in this article can be found on GitHub, in the jsexpense repo. The application is an Express.js application, so many code samples will be presented as a Jade template.
Installation
The Angular Material library can be installed using Bower or npm:
npm install angular-material
bower install angular-material
To use the library in HTML, you need to include the following scripts:
<script src="/node_modules/angular/angular.js"></script>
<script src="/node_modules/angular-aria/angular-aria.js"></script>
<script src="/node_modules/angular-animate/angular-animate.js"></script>
<script src="/node_modules/angular-material/angular-material.js"></script>
The AngularJS and Angular-Aria libraries are needed for Angular Material. The other option is to use one of the CDNs and include those in the jade/HTML file (this code is from layout.jade):
block script
      script(src='https://ajax.googleapis.com/ajax/libs/angularjs/1.3.15/angular.min.js')
      script(src='https://ajax.googleapis.com/ajax/libs/angularjs/1.3.15/angular-animate.min.js')
      script(src='https://ajax.googleapis.com/ajax/libs/angularjs/1.3.15/angular-aria.min.js')
      script(src='https://ajax.googleapis.com/ajax/libs/angular_material/0.11.2/angular-material.min.js')
The Header, Lists and Buttons
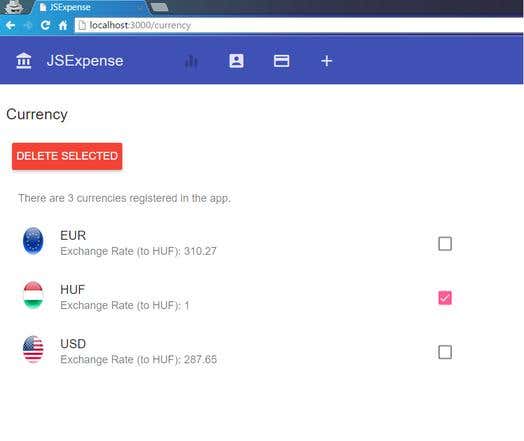
The currencies screen (screenshot below) is composed of the header, a label, the Delete Selected button, the summary text that displays how many currencies are in the application, and the list of currencies. Each list item is composed of an image, the name of the currency and exchange rate, as well as a selection indicator at the end of each line.
Here is the Jade template code for the header (toolbar):
block header
  div(ng-controller='AppCtrl' ng-cloak='')
    md-content
      md-toolbar
        div(class='md-toolbar-tools')
          md-button(class='md-icon-button' aria-label='JSExpense' href='/')
            md-icon
              i(class='material-icons') account_balance
          h2
            span #{title}
          md-button(class='md-icon-button' aria-label='JSExpense' )
          md-button(class='md-icon-button' aria-label='Currency' href='/currency' ng-disabled='#{disableCurrency}')
            md-icon
              i(class='material-icons') equalizer
          md-button(class='md-icon-button' aria-label='Members' href='/member' ng-disabled='#{disableMember}')
            md-icon
              i(class='material-icons') account_box
          md-button(class='md-icon-button' aria-label='Expenses' href='/expense' ng-disabled='#{disableExpense}')
            md-icon
              i(class='material-icons') credit_card
          md-button(class='md-icon-button' aria-label='Add' href='/add' ng-disabled='#{disableAdd}')
            md-icon
              i(class='material-icons') add
The generated HTML is the following:
<div ng-controller="AppCtrl" ng-cloak="">
    <md-content>
        <md-toolbar>
            <div class="md-toolbar-tools">
                <md-button aria-label="JSExpense" href="/" class="md-icon-button">
                    <md-icon><i class="material-icons">account_balance</i></md-icon>
                </md-button>
                <h2><span>JSExpense</span></h2>
                <md-button aria-label="JSExpense" class="md-icon-button"></md-button>
                <md-button aria-label="Currency" href="/currency" ng-disabled="false" class="md-icon-button">
                    <md-icon><i class="material-icons">equalizer</i></md-icon>
                </md-button>
                <md-button aria-label="Members" href="/member" ng-disabled="false" class="md-icon-button">
                    <md-icon><i class="material-icons">account_box</i></md-icon>
                </md-button>
                <md-button aria-label="Expenses" href="/expense" ng-disabled="false" class="md-icon-button">
                    <md-icon><i class="material-icons">credit_card</i></md-icon>
                </md-button>
                <md-button aria-label="Add" href="/add" ng-disabled="false" class="md-icon-button">
                    <md-icon><i class="material-icons">add</i></md-icon>
                </md-button>
            </div>
        </md-toolbar>
    </md-content>
Looking at the HTML code, it can be said that all the Angular-Material items are directives. The header is built up by an md-toolbar, which has md-buttons with md-icons inside. The icons are from the standard set that comes with Google’s material spec, all of which can be found on this page.
The header has a main button that navigates to the root, as well as the JSExpense application header. Next come the buttons for the different pages – first is currency, then member, expense and add.
The Delete Selected button is also an md-button, but with different styling:
md-button(class='md-raised md-warn' ng-click='deleteCurrencies()') Delete SelectedThe generated HTML as form is very similar to the template.
<md-button ng-click="deleteCurrencies()" class="md-raised md-warn">Delete Selected</md-button>The ng-click directive allows the assignment of some behavior to the clicked item, which is the md-button in this case. The deleteCurrencies() method checks which of the items are selected in the list and uses the applications API to delete the data:
$scope.deleteCurrencies = function () {
    var remaining = [];
    $scope.currencies.forEach(function (item) {
        if (item.isSelected) {
            $http.delete('/api/currencies/' + item.name).then(function (resp) {
                console.log('Deleting currency ' + item.name + '. NrOfDeleted Items is ' + resp.affectedRows);
            }, function (error) {
                console.error(error);
            })
        }
        else {
            remaining.push(item);
        }
    });

    $scope.currencies = remaining;
};
The list of the currencies along with the images is built using md-list directive. The md-list has an md-subheader, which is used to display the number of items in the currencies collection. For each item in the currencies array there is a new md-list-item created with an image, a div holding the name of the currency, and a paragraph for displaying the exchange rate. The last item is the md-checkbox which can be used to select the currency.
md-list
  md-subheader(class='md-no-sticky') There are {{currencies.length}} currencies registered in the app.
  md-list-item(class='md-2-line' ng-repeat='item in currencies')
    img(src='/images/{{item.name}}.png' class='md-avatar' alt='{{item.name}}')
    div(class='md-list-item-text' layout='column')
      h3 {{item.name}}
      p Exchange Rate (to HUF): {{item.conversionRate}}
    md-checkbox(class='md-secondary' ng-model='item.isSelected')
The generated HTML code is the following:
<md-list>
    <md-subheader class="md-no-sticky">There are {{currencies.length}} currencies registered in the
        app.
    </md-subheader>
    <md-list-item ng-repeat="item in currencies" class="md-2-line"><img
            src="/images/{{item.name}}.png" alt="{{item.name}}" class="md-avatar">

        <div layout="column" class="md-list-item-text"><h3>{{item.name}}</h3>

            <p>Exchange Rate (to HUF): {{item.conversionRate}}</p></div>
        <md-checkbox ng-model="item.isSelected" class="md-secondary"></md-checkbox>
    </md-list-item>
</md-list>
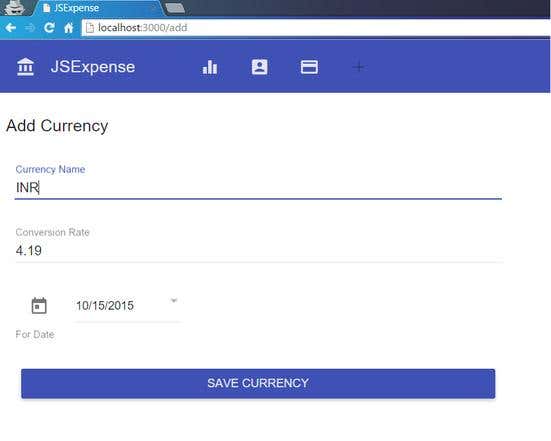
Forms and Input Controls
On the Add Currency page there is a form with three inputs, two text inputs, and a date picker. Inputs should be wrapped by md-input-containers in Angular-Material, while date picking is handled by md-datepicker directive.
form()
    md-content(md-theme='docs-dark' style="width:40%" layout='column' layout-sm='column' layout-padding='layout-padding')
        md-input-container
            label Currency Name
            input(ng-model='currency.currency' required='required' name='currency')
        md-input-container
            label Conversion Rate
            input(ng-model='currency.conversionRate' name='conversionRate')
        md-input-container
            label For Date
            md-datepicker(ng-model='currency.forDate' placeholder='Date of the conversion rate' name='forDate')
        md-input-container
            md-button(type='button' ng-click='saveCurrency()' class='md-raised md-primary' ) Save Currency
Here is a screenshot of the Add Currency page:
The saveCurrency() method takes the data from $scope.currency object and creates a new currency by POSTing to /api/currencies.
$scope.saveCurrency = function () {
    console.log($scope.currency);
    $http.post('/api/currencies', $scope.currency).then(function (response) {
        console.log('Currency saved with Id:' + response.currencyId);
    },
    function (error) {
        console.error(error);
    });
};
Angular Material has a lot of components, but only a few were covered here to show how today’s Web technologies can be combined. This sample application uses node.js, Jade template engine, MySQL, AngularJS, and Angular Material, and can be used as a template that can be extended depending on the developer's needs.